Hello Friends,
We all knows calling a web service from Android Application is very normal thing, so today here i am gonna tell you how to make php web service and calling that web service through Android application for storing data into MYSQL database.
First, i will tell you making of Php web service, having connection with MySql database, insert query for MySql database, sending result to application using this Php web service.
the code of connection with database is :
config.php
config.php
<?php$servername = "localhost";$username = "root"; // USER NAME OF MYSQL IN YOUR PROJECT IT COULD BE DIFFRENT$password = "root"; // PASSWORD OF MYSQL IN YOUR PROJECT IT COULD BE DIFFRENT$database = "MyDatabase";//create connection$conn = mysqli_connect($servername, $username, $password, $database );//Checking Connectionif(!$conn){die("Connection failed:".mysqli_connect_error());}?>
the code of Php web service having database query and sending response to calling application :
index.php
<?phpinclude "config.php";/****GETTING DATA FROM ANDROID***/$username = htmlspecialchars($_GET['android_username']);$pass = htmlspecialchars($_GET['android_pass']);if(isset($username) && !empty($username) && !empty($pass) && isset($pass)) {$query = "INSERT INTO user (Username, Password) VALUES ('".$username."','".$pass."');";$result = mysqli_query($conn, $query); // EXECUTTING QUERYif($result){ // IF THIS IS TRUE MEANS QUERY IS EXECUTTEDecho json_encode("Data is Added"); // SENDING RESULT TO ANDROID}else{echo json_encode("Data is not Saved");}}else {echo json_encode("field is empty") ;}mysqli_close($conn);?>
Second, i will tell you about where to save these files,
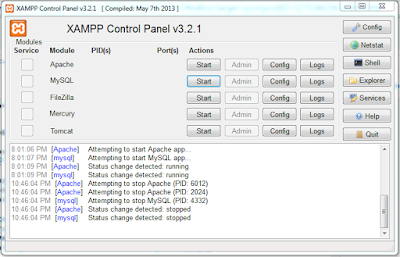
For executing php file, you should have any server in your system, i have done this with XAMPP server, start XAMPP and start apache tomcat server in XAMPP and MySql service.
then, open directory where you have installed XAMPP server, and open httdocs folder, in this folder make your project new folder (my project folder name is PhpProject) after that save both files written above in this folder.
now open your browser and type localhost/phpmyadmin this will open phpmyadmin to make your table...as per my code table name is user , column name is Username, Password, ID
if, you change these, then you will have to change in index.php
now, start Android Programming in any IDE supporting android programming,
So, Third, step is to call this api through android application,
the hierarchy of files in android application is show below,
The code of AndroidManifest.xml is :
<?xml version="1.0" encoding="utf-8"?><manifest xmlns:android="http://schemas.android.com/apk/res/android"package="com.phpapi"android:versionCode="1"android:versionName="1.0" ><uses-sdkandroid:minSdkVersion="8"android:targetSdkVersion="21" /><uses-permission android:name="android.permission.INTERNET"/><applicationandroid:allowBackup="true"android:icon="@drawable/ic_launcher"android:label="@string/app_name"android:theme="@style/AppTheme" ><activityandroid:name=".MainActivity"android:label="@string/app_name" ><intent-filter><action android:name="android.intent.action.MAIN" /><category android:name="android.intent.category.LAUNCHER" /></intent-filter></activity></application></manifest>
The code of activity_main.xml is :
<RelativeLayout xmlns:android="http://schemas.android.com/apk/res/android"xmlns:tools="http://schemas.android.com/tools"android:layout_width="match_parent"android:layout_height="match_parent"android:paddingBottom="@dimen/activity_vertical_margin"android:paddingLeft="@dimen/activity_horizontal_margin"android:paddingRight="@dimen/activity_horizontal_margin"android:paddingTop="@dimen/activity_vertical_margin"tools:context=".MainActivity" ><EditTextandroid:id="@+id/etUsername"android:layout_width="wrap_content"android:layout_height="wrap_content"android:layout_alignParentTop="true"android:layout_centerHorizontal="true"android:layout_marginTop="21dp"android:ems="10"/><EditTextandroid:id="@+id/etPassword"android:layout_width="wrap_content"android:layout_height="wrap_content"android:layout_alignLeft="@+id/etUsername"android:layout_below="@+id/etUsername"android:layout_marginTop="33dp"android:ems="10"android:inputType="textPassword" /><Buttonandroid:id="@+id/sendingButton"android:layout_width="wrap_content"android:layout_height="wrap_content"android:layout_below="@+id/etPassword"android:layout_centerHorizontal="true"android:layout_marginTop="38dp"android:text="Send" /></RelativeLayout>
The code of MainActivity.java is :
package com.phpapi;

import java.io.BufferedReader;
import java.io.InputStream;
import java.io.InputStreamReader;

import org.apache.http.HttpEntity;
import org.apache.http.HttpResponse;
import org.apache.http.client.HttpClient;
import org.apache.http.client.methods.HttpPost;
import org.apache.http.impl.client.DefaultHttpClient;
import org.json.JSONArray;
import org.json.JSONException;
import org.json.JSONObject;

import android.os.AsyncTask;
import android.os.Bundle;
import android.app.Activity;
import android.util.Log;
import android.view.Menu;
import android.view.View;
import android.view.View.OnClickListener;
import android.widget.Button;
import android.widget.EditText;
import android.widget.Toast;

public class MainActivity extends Activity {

 EditText u;
 EditText p;
 int y;
 String username, password, success;
 String record1 = "";

 @Override
 protected void onCreate(Bundle savedInstanceState) {
  super.onCreate(savedInstanceState);
  setContentView(R.layout.activity_main);

  u = (EditText) findViewById(R.id.etUsername);
  p = (EditText) findViewById(R.id.etPassword);

  Button b1 = (Button) findViewById(R.id.sendingButton);
  b1.setOnClickListener(new OnClickListener() {

   @Override
   public void onClick(View arg0) {
    // TODO Auto-generated method stub
    username = u.getText().toString();
    password = p.getText().toString();
    new Asy().execute();
   }
  });

 }

 class Asy extends AsyncTask<Void, String, String> {

  protected void onPreExecute() {
   Toast.makeText(getApplicationContext(), "Sending..",
     Toast.LENGTH_SHORT).show();
  }

  protected String doInBackground(Void... params) {

   String response = getData();
   return response;
  }

  protected void onPostExecute(String response) {

   if (response.equals("Data is Added")) {
    u.setText("");
    p.setText("");
   }

   Toast.makeText(getApplicationContext(), response,
     Toast.LENGTH_SHORT).show();

   super.onPostExecute(response);

  }
 }

 public String getData() {
  String result = "";

  InputStream is = null;
  // To getting Data
  try {

   HttpClient httpclient = new DefaultHttpClient();

   HttpPost httppost = new HttpPost(
     "http://10.0.2.2/PhpProject/index.php?android_username="
       + username + "&android_pass=" + password + "");

   HttpResponse response = httpclient.execute(httppost);
   HttpEntity entity = response.getEntity();
   is = entity.getContent();

   Log.e("log_tag", "connection success ");

  } catch (Exception e) {
   Log.e("log_tag", "Error in http connection " + e.toString());

  }
  // Convert response to string
  try {
   BufferedReader reader = new BufferedReader(new InputStreamReader(
     is, "UTF-8"), 8);
   StringBuilder sb = new StringBuilder();
   String line = null;
   while ((line = reader.readLine()) != null) {
    sb.append(line);

   }
   is.close();

   result = sb.toString().trim();
   Log.e("log_tag", "result--> " + result);

  } catch (Exception e) {
   Log.e("log_tag", "Error converting result " + e.toString());

  }

  return result;
 }

}
when you will run this code of android in android emulator..you will see two fields, enter data into those fields and enter send button...
NOTE: the xampp server's, tomact and mysql must be started, before sending data from android application
You can understand more by watching my video on youtube:
If you have any queries suggestions please comment below


0 comments
If you have any questions or suggestions, you are free to ask, i will appreciate that and, i will try my best...